Notice that I set permissions so ONLY ROOT can access this file? This is really important! Your cloudflare API key is the same as your account password so anyone getting it can make any changes to your account that you can! Make sure you keep this file safe!
Contents
Have a server that’s offering services that need to be secured with TLS but you can’t install a web server, can’t open port 80 or have something using that port you can’t shutdown? How do you get free Let’s Encrypt certificates? If you’re using Cloudflare for your DNS we can use certbot and automate the whole thing including renewals! If you’re using another DNS server provider, the basic process still works too.
This post is focused on getting things set up on Debian 9 (Stretch) using Cloudflare as your DNS host. However, certbot supports quite a few DNS providers and the process is pretty similar. Just check out their documentation for the specifics. That being said, taking a quick read of this post might still help you understand how it all works. For those of you using Debian and Cloudflare, let’s get to it!
Why use DNS validation
In general, you should be using DNS validation only if you cannot set up even a temporary web server on your system. In most cases, this is used when you have a firewall blocking port 80 that you do not have access to, cannot configure or you’re behind a NAT system and port 80 is already otherwise redirected. Security concerns may also play a part in not wanting to spin-up even a temporary web server on your system. On the other hand, maybe you just don’t want to set anything else up on your system, you just want certificates! That’s ok too :-) Oh, two other big reasons to go this route:
- You want to get certificates on this machine but use them on another machine, so you need the actual certificate files to copy/sync/etc.
- You want a wildcard certificate!
How it works
Certbot will make a request to Let’s Encrypt with the domains for which you want certificates issued. Let’s Encrypt will then generate tokens that must be placed as TXT records in the DNS records for those domains. If those tokens are added and Let’s Encrypt can see them, then it’s assumed you control the DNS records for those domains and, thus, are authorized to request certificates for them. Certbot will then generate those certificates and you’re good to go. That’s the very brief overview of how this works. Now, you may have gathered that at some point certbot will have to update your DNS records with that token and then remove those records when you’re done, right? Fortunately, there’s a plugin that makes this very easy with Cloudflare.
Set up a credential file
First, you’ll need to get your Cloudflare Global API password:
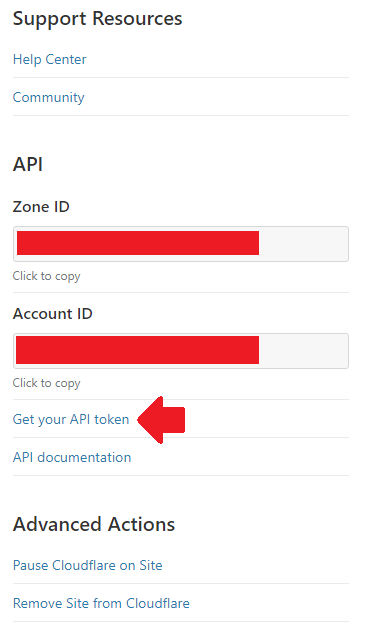
- Log into Cloudflare and click on one of your sites so you get to the Dashboard page.
- Scroll down to the bottom and notice the API section in the right sidebar. Click on Get your API token.
(screenshot)
 [close]
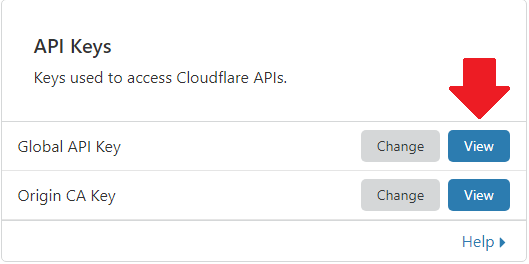
 - In the box that’s labelled API Keys, click the View button next to Global API Key.
(screenshot)
 [close]
 - You’ll be prompted for your password.
- Copy your API key or put in a text file temporarily or something. We’ll need it in a few minutes.
On your server, find a safe place (I usually choose /root) and make a file for our cloudflare credentials. Here’s an example of how I usually set it up.
# I'm assuming you're already at a root shell
cd /root
# create our credential file
touch cloudflare.credentials
# restrict access to root only!
chown root:root cloudflare.credentials
chmod 600 cloudflare.credentialsNow, open the file in your favourite text editor and add the following lines (obviously replace my example stuff with your actual info):
# Cloudflare credentials for use by certbot
dns_cloudflare_email = [email protected]
dns_cloudflare_api_key = 5zAbDw9V566PzvdSqyMvg5NS6ZxVvF7k2T2GU
Install certbot with Cloudflare plugin
If you’re not using Debian, you’ll have to consult the certbot documentation and do some Googling. The documentation on how to use various plugins is excellent, documentation on installing them is lacking to say the least. Sorry, I only use Cloudflare so I can only help you out with that… unless I get a ton of requests for something else (comment below!). Ok, let’s get this installed:
I'm using Debian 9 (Stretch)
The default Stretch apt repo has a very old version of certbot. We need to add the stretch-backports repo so we can install the latest certbot. Let’s create a new source list file:
cd /etc/apt/soruces.list.d
touch stretch-backports.list
Open that file in your favourite text editor and add the following line.
deb http://deb.debian.org/debian stretch-backports mainSave the file, update apt with our new source and install certbot with the cloudflare plugin using the backports repo:
apt update
apt install python3-certbot-dns-cloudflare -t stretch-backports
I'm using Debian 10 (Buster)
The latest certbot is already in the default Buster repo, so this is nice and easy:
apt install python3-certbot-dns-cloudflareGet your certificate
It’s a long command so make sure you re-check your typing a few times:
certbot certonly --dns-cloudflare --dns-cloudflare-credentials /root/cloudflare.credentials --dns-cloudflare-propagation-seconds 30 --rsa-key-size 4096 -d domain.tld,www.domain.tld,sub.domain.tld --agree-tos -m [email protected] --no-eff-email| Parameter | Meaning |
|---|---|
| certonly | Get certificates only, don’t try to install it anywhere. |
| dns-cloudflare | Use Cloudflare plugin to generate and cleanup DNS challenges. |
| dns-cloudflare-credentials | Path to the credentials file you created earlier. |
| dns-cloudflare-propagation-seconds | Delay to allow challenge TXT records to propagate and be accessible for Let’s Encrypt to lookup. I find 30 seconds is more than enough since Cloudflare is pretty fast. |
| rsa-key-size | Bit-length of our private key. The default is 2048 bits but modern computing power makes 4096 more reasonable. |
| d | List of domains to include as SAN entries. If you want to use a wildcard, specify it first like *.example.com (asterisk dot example dot com). |
| agree-tos | Agree to the ACME/Let’s Encrypt terms of use without a prompt. |
| m | Email address for notifications from Let’s Encrypt, things like expiration warnings, etc. |
| no-eff-email | Opt-out of the Electronic Frontier Foundation mailing list… it’s a good newsletter so consider this parameter very optional. |
The list of SAN names (-d paramter) is processed in order! This means the first entry will become your certificate’s common name. In general, this should be your root domain, like example.com. Be very careful that you select the first entry correctly, the order of the others doesn’t matter. If you’re using a wildcard, you must specify that first so it’s the common name! If you are only specifying one domain name, you don’t have anything to worry about.
I need certbot to restart an app/service after renewing my certificate
If you’re using your certificate to secure an application that requires a restart to read the new/renewed certificate, then certbot can handle that for you. You can provide a command directly or a path to a script file with the necessary commands. Simply add the following to the command above (I’ll give you examples of both a command and a script):
# run a command upon successful renewal
--deploy-hook "systemctl restart myapp.service"
# run a script upon successful renewal
--deploy-hook "/bin/sh /usr/local/bin/restart.sh"
Where’s my certificate?
Your certificate and key are stored in /etc/letsencrypt/archive/your.domain.tld/. However, that will also store all old certificates (remember that Let’s Encrypt certificates expire every 90 days). Therefore, you must always reference the symlinks at /etc/letsencrypt/live/your.domain.tld in order to refer to the correct files. They are named as follows:
| File | What is it? |
|---|---|
| cert.pem | Your certificate in PEM format. |
| chain.pem | The certificate chain, in PEM format, for your certificate. In other words, the intermediate and root CA certificates. |
| fullchain.pem | Your certificate and the entire certification chain, in PEM format. This is a concatenated version of cert.pem and chain.pem that is most likely what you will be using for whatever application you are securing. |
| privkey.pem | Your private key, in PEM format. |
Test auto-renewal
Certbot will auto-renew your certificates once they have 30 days or less remaining before expiry. But, we should probably make sure that can happen without any problems, right? The first part of our test involves checking the renewal parameters file:
I have a renewal hook
Let’s cat our renewal file so we can inspect it:
cat /etc/letsencrypt/renewal/your.domain.tld.confNow, check the [renewalparams] section and make sure it looks something like this:
[renewalparams]
authenticator = dns-cloudflare
renew_hook = systemctl restart myapp.service
rsa_key_size = 4096
dns_cloudflare_credentials = /root/cloudflare.credentials
server = https://acme-...
account=d7j398dlke93kdhf93kd93dl903jf30d
dns_cloudflare_propagation_seconds = 30
Ensure the RSA key size is as you specified and that your renewal hook is correct. Edit this file as needed if there are any mistakes.
I don't have any renewal hooks
Let’s cat our renewal file so we can inspect it:
cat /etc/letsencrypt/renewal/your.domain.tld.confNow, check the [renewalparams] section and make sure it looks something like this:
[renewalparams]
authenticator = dns-cloudflare
rsa_key_size = 4096
dns_cloudflare_credentials = /root/cloudflare.credentials
server = https://acme-...
account=d7j398dlke93kdhf93kd93dl903jf30d
dns_cloudflare_propagation_seconds = 30
Ensure the RSA key size is as you specified. Edit this file as needed if there are any mistakes.
Now that we’ve confirmed our configuration, let’s test whether or not things actually execute properly:
certbot renew --dry-runThis will generate a real renewal request, generate tokens and verify them via DNS, but will not actually generate new certificates or count against your daily limits. It should complete successfully. If you have any renewal-hooks, certbot will mention that it “skipped” them which lets you know that when this happens for real, it understands what commands it should run.
Renewal timers
The last thing we need to check is that the renewal timers are functioning correctly, otherwise certbot will not be called and your certificates will expire! By default, certbot is called twice a day (once at midnight and once at noon) to renew your certificates if necessary. This is accomplished via a cronjob or systemd timer.
cronjob
If you check out /etc/cron.d/certbot, you’ll see the following:
0 */12 * * * root test -x /usr/bin/certbot -a \\! -d /run/systemd/system && perl -e 'sleep int(rand(3600))' && certbot -q renewThis means that every 12 hours at midnight and noon, check to see if Certbot is installed and that systemd is NOT installed. If those conditions are met, run certbot in renew mode quietly. If your system is not using systemd, then this is how your renewals will be processed so be aware of this cronjob!
systemd
On most current Debian/Ubuntu systems, you are using systemd and thus, the cronjob above will not run. Instead, there is a systemd service and timer installed. Let’s verify all is good with those:
systemctl list-timersYou should see ‘certbot.timer’ listed. Now, let’s make sure the files that define this timer and it’s accompanying service exist too:
ls -lA /lib/systemd/system/certbot*You should see both ‘certbot.timer’ and ‘certbot.service’ listed. Let’s check the status of these components:
systemctl status certbot.service   #should show loaded but dead
systemctl status certbot.timer   #should show loaded and active(waiting)
You should also ensure that when checking the status of the ‘certbot.timer’ the ‘Loaded:’ line lists the timer as ‘enabled’ otherwise it will not be automatically started after a reboot. If it’s showing ‘disabled’, then run the following:
systemctl enable certbot.timerFinal thoughts
That’s it! You have free certificates that will auto-renew and you don’t need a web server or have to fiddle with firewall rules or anything – everything is handled via your DNS at Cloudflare. Nice and simple.
Thanks for reading my techie-thoughts on this issue. Have any comments or suggestions? Want to add your tips? Things you want me to cover in a future article? Comment below!